Wednesday, October 04, 2006
Little Bunnies!
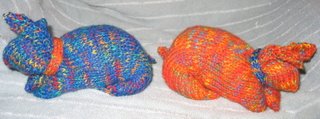
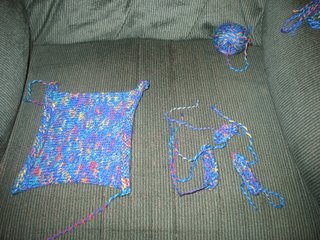
Here's a project that my dd#1 quickly whipped up for a gift for the baptism of twins (besides a pan of lasagne for the mom and dad--that I made).
The Knitted Bunny is an easy project. Just knit a square! Well......and some ears...and we knit a tail instead of pulling out a bit of fluff. We also knit collars in the contrasting colors. (Just a 4 or 5 stitch i-cord, knit to fit.)
Instructions for tail:
CO 5
1: k
2: k2, p, k2
3: Repeat rows 1 & 2, 5 times more (6 times total)
4: ssk, k, k2tog
5: k, p, k
6: sl 1, k2tog, psso
7: cut yarn & pull through last st.
We did the ears this same way except we did a total of 8 repeats of rows 1 & 2.
This yarn is Schoeller + Stahl, Hobby Kids Color, color 4669 and 4666. We picked up a pink (4664) yesterday at the yarn store to make another for the older (3yo) sister. She has captured one of the twin's bunnies and it's living in her purse!
Thank you to Michelle, the owner at Loose Ends Yarn Shop, for recommending this pattern! It is fun to see the bunnies come to life!
A World of Wallabies
Finally! I've waited and waited for this post. The plan for this summer was to complete the four Wallabies. Mine has already been posted on this blog...not too long ago on August 3rd.
The next one I completed was for dd#2 since the yarn had to be ordered for the other two.
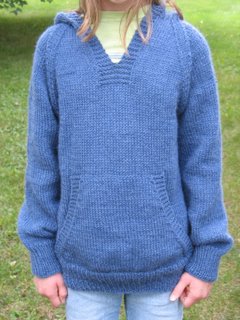
This one is in Cascade 220 color #9326 (denim). It's a child's size 12. Needles were sizes 6's and 8's. I did go into the 5th skein just a little.
Once the yarn came in for the other two, I decided to do the smaller one first. Dd#3 choose a sky blue (Cascade 220 #7815). This is a size 8. A little big right now...but I was hoping the sweater would fit for a few years.
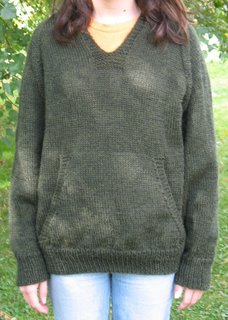
Dd#1 chose a dark green (Cascasde 220 #9448). It is an adult medium (room to grow) and the body is an extra inch longer per dd's request. She was disappointed that her's wasn't done when we went to see "Julius Caesar". I finished this one at 10pm the night before we went to see "Romeo and Juliet".
We all wore them to the play...long sleeve undershirt, turtleneck and Wallaby...no jacket...and we were very comfortable. My legs on the other hand could have used a layer of wool...and is where my "just in case" jean jacket ended up. I'll have to knit little wool lap blankets for next year...that'd be easier than knitting long underwear! My cuddle duds weren't enough.
These aren't fancy sweaters. I see them as a knit sweatshirt jacket. These are perfect for running around outside or sitting by a campfire. At first my dd's were leary about wearing them to play in since they are hand knit by mom. I reassured them that this is indeed why I knit them. Anything I knit I intend for the item to be used and loved. It may cause them to wear out or get a hole but that is the purpose...not to sit in a drawer to be pulled out and looked at when company comes over! Use the darn things!
One would think this is enough Wallaby knitting but.......my dh has been wondering where his is! So last night I cast on for his. He chose the same color as mine. I was thinking of doing the overlapping placket for his so it will be easier to tell them apart at a glance. He, at first, didn't want the hood but has decided to keep it on...perhaps he noticed how comfortable I was at "Romeo and Juliet" with my hood up!
Austermann Step Socks
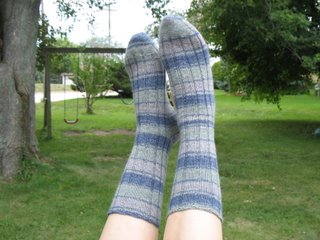
This is the yarn with Aloe Vera and Jojoba Oil.
The color...hmmm....can't seem to find the ball band. They are grey, denim and mellow moss green.
I did these toe up Queen Kahuna style on two size 0 Addi Turbo circular needles.
These are VERY comfortable socks!
I wore these to the APT to see the play "Julius Caesar" and we got drenched! Even though the socks were soaking wet (read: puddles in my shoes) they were extremely soft and my feet were not cold in the least little bit (it was about 60 degrees that day).
APT is a great place to see a Shakespearean play. We saw "Romeo and Juliet" just last week. WOW! It was fantastic! (I wore the same socks...the weather was in the 50's and dry...my feet were cozy!) We saw MacBeth last year and that is what got us hooked. We haven't seen any of the plays at night *yet*. The nighttime performances are reportedly out of this world....even better than the daytime ones. Inconceivable!
Friday, September 01, 2006
Absorba Rug
This is the Absorba Pattern from Mason Dixon Knitting (p. 82). The pattern called for 3 strands of Peaches & Cream Double Worsted. I used four strands of just the regular Sugar & Cream from the store. Two strands were constant: White and Ecru. The other two strands were changed each section. The choices for those strands were Jute, Country Sage Ombre, Citris Fruits, or Natural Ombre.
We're using this rug in the bedroom so we made it longer...it's 5.5 feet by 2 feet. I also crocheted an edge around it. We like it even though it's not knit as tight as the one in the Mason-Dixon book. Should have used 6 strands for that I guess....or ordered the double worsted yarn. Maybe some day I'll do a thick one for the bathroom.
Needle size used: Knit Picks' Options size 15 needles with 40"cable. Size 10 crochet hook for edge.
Two more dishcloths
I finished a bunch of projects this summer. I'm hoping to get the pictures up soon...hopefully this weekend.
Here are two more dishcloths.
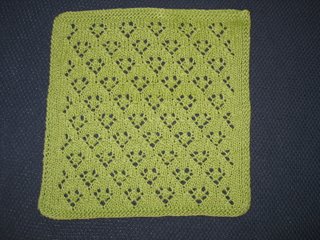
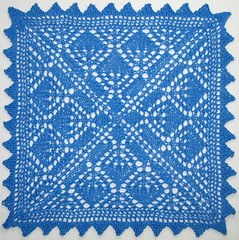
This first one is Elfin Lace from Barbara Walker's Treasury of Knitting Patterns, Vol 1., p. 208.
I charted the pattern out with the keyboard which worked really great. I used size 3 needles with size 3 Crochet Thread (100% mercerized cotton). I did 5 rows of garter stitch after casting on (55 st.) and a 3 st. garter edge on each side. Then five repeats of the pattern (16 row repeat) plus one more row 1 before doing the 5 rows of garter stitch and binding off.
This next cloth used the Bumblebee Pattern from Barbara Walker's 3rd vol., p. 155. I used Cotton DK Freedom (50% off purchase) in a bumblebee yellow.
CO 56 st. 5 rows of garter stitch. 4 1/2 pattern repeats (12 row pattern) with 3 garter stitch border on sides (end after an odd row is completed). 5 rows of garter stitch. BO.
Thursday, August 03, 2006
Wonderful Wallaby!
This pattern has been calling me for awhile. I finally broke down and bought the yarn for it. I chose a greyish green which is fairly neutral. It only took about 2-3 weeks to knit up.
I started first with the sleeves to see if I was getting guage. This was nice. When I got to the point on the body to add the sleeves they were already done and I could continue on.
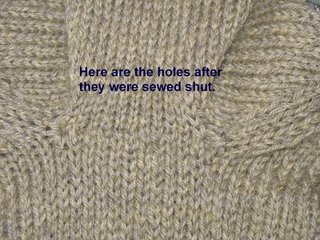
The holes I had at each side of the underarm concerned me a bit. But I ended up weaving the stitches around the hole and pulling it shut. Worked great! I put light rings around the 2 finished holes with the computer. You can barely see the rings. If you click on the picture maybe they'll show up better???
Yarn: Cascade 220 - Color 4011 (7 skeins)
Needles: Addi Turbo: 6's and 8's
Added 8/4/06
This is a fairly quick knit. The stockinette stitch is mindless enough to knit while watching TV, visiting, or waiting somewhere. There is enough intrigue to break up the humdrum of the stockinette areas....start the pouch, fuse the pouch, add the sleeves, front placket, yoke decreases. All three girls want one. I think it will be perfect to play in outside when it's starting to get cold and coats aren't quite needed....or not put on. It's very comfortable and cozy.
I also wanted to add some of the hints I followed when making this sweater. Helpful website: Wallaby FAQ website
To make the hood less pointy: I did a stockinette hood so I did this tip - "put the two center stitches between markers about 2.5" from the top of the hood, then every other knit row decrease before the first marker and after the second marker."
Set up for pouch: p. 23 of Wallaby Pattern - 1st paragraph. This tip has you knitting a stitch in the row below with a separate needle for the pouch and slipping the body stitch to your body needle. Wasn't too fuddily holding both needles in my right hand. The Knitpicks Options needles came in handy with this part on the second Wallaby (didn't have those needles for this first one).
Front Placket: p. 23 of Wallaby Pattern - The "(2)" suggestion from Choppie Tarbox.
Arm increases: I didn't do all the arm increases in the row following the cuff. I thought that'd make it too puffy in the wrist. I did the "alternate method of increasing" on page 8 of pattern (kid's section). Funny thing was I didn't know that was there until I was knitting the arms for the second Wallaby for dd#2. Here I thought I was breaking the rules!
Thursday, July 20, 2006
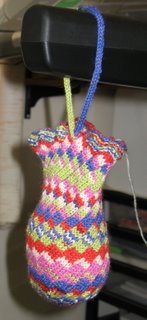
Knit wrist bag with sock yarn
Here's a little bag I was inspired to make. The inspiration came from Judith at Knitting Pattern Depot. Thanks Judith!
I loved the idea but wanted to use sock yarn for the bag. I've got a lot of sock yarn! This yarn is Lion Brand Magic Stripes in Jelly Bean. It took one day to decide what I wanted to do and two days to knit it...not straight knitting!
The pattern is from Lucy Neatby's Cool Socks, Warm Feet. It is the Mermaid sock with the wavy cuff (84 st. - second largest size on Addi turbo #1's). I added a hole in the last round of the cuff and first round of the fishtail pattern stitch**. I worked the pattern for 5 1/4 inches and then did the spiral toe decrease. The i-cord handle is 4 stitches wide.
I can put the sock in here too! Although the needles do poke through.
This would also make a really cute slip cover for a vase!
**Instructions for hole: On 3rd repeat of Rd 4: P6, P2tog (3x), P rest of round.
Next round: K2, yo, K2, K2tog, M2, yo, M1, K1, K2tog, *K2, yo, K2, K2tog* Repeat between asterisks for rest of round.
Thursday, June 29, 2006
Memorial Day projects!
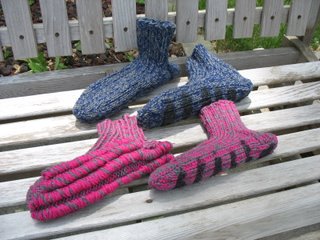
These two pair of Scrumptious Shagged Slipper Socks were started and completed on Memorial Day weekend. They are a *his* and *her* pair given to my in-laws on Father's Day. The paint on the bottom of the slipper is "Dip it" bought at Home Depot. I stuffed plastic bags into the slippers and used a disposable foam brush to apply the stripes of paint. It is rubbery when dry.
The yarn is Cascade 220. Two skeins of gray were enough for both slippers. I also bought two skeins of the blue and the pink. I've got a full skein of the pink left.
The blue are large women size and the pink are large child size. They appeared to fit my in-law's feet ok. This picture is a bit misleading on the sizes. The one pink one is inside out so you can see the shagging on the bottom.
It's a great pattern and a quick knit. I'd recommend these slippers to anyone who would like to walk around on a cloud (with warm feet)!
Wednesday, May 17, 2006
Mitten Toes!
Another pair of socks finished!
These are in Trekking XXL (color 71). Guage 10st/inch. CO 70 st. to Addi Turbo #0's (2 circs-one sock on each pair of needles). The cuff and lacy leg pattern is from Crazy Toes & Heels Book, p. 64. (Yarn overs and K2tog/SSK in the knit part of the ribbing on row 3 of a 4 row pattern.) The heel flap is the Eye of Partridge with the slipped stitches slipped as if to knit. It is hard to *see* the pattern with the dark yarn but I like the feel of the fabric. I continued the lace pattern down the instep...however lacy #0 needles with sock yarn can be. You can sort of see my skin through the teeny holes.
Then I started on the toes. Let's just say I'm not afraid of ripping out and/or tinking many rows to experiment with new techniques. I wanted to try making mitten toes since such a pair has been requested for dd#3 and I'd rather experiment with my own socks/toes first. I eventually ended up taking off 10 st. on each needle to save for the big toe. I cast on 10 st in between the big toe and second toe and knit around decreasing only on the pinky toe side until almost done. I kept track of rows and continued to try them on just about every other row to get them the right length. Kitchenered off. Then back to the big toe. Put the 10 st back on 2 circs and picked up 14 st between the toes...seemed like a good number to avoid holes. Did some decreasing at the top of the big toe and kitchenered off. Ditto for the left foot...except I found out my left foot is bigger by a few rows.
I'd say they are pretty comfy and fun to wear! And I'd be willing to knit them again...second and third time should be easier, right?
These are in Trekking XXL (color 71). Guage 10st/inch. CO 70 st. to Addi Turbo #0's (2 circs-one sock on each pair of needles). The cuff and lacy leg pattern is from Crazy Toes & Heels Book, p. 64. (Yarn overs and K2tog/SSK in the knit part of the ribbing on row 3 of a 4 row pattern.) The heel flap is the Eye of Partridge with the slipped stitches slipped as if to knit. It is hard to *see* the pattern with the dark yarn but I like the feel of the fabric. I continued the lace pattern down the instep...however lacy #0 needles with sock yarn can be. You can sort of see my skin through the teeny holes.
Then I started on the toes. Let's just say I'm not afraid of ripping out and/or tinking many rows to experiment with new techniques. I wanted to try making mitten toes since such a pair has been requested for dd#3 and I'd rather experiment with my own socks/toes first. I eventually ended up taking off 10 st. on each needle to save for the big toe. I cast on 10 st in between the big toe and second toe and knit around decreasing only on the pinky toe side until almost done. I kept track of rows and continued to try them on just about every other row to get them the right length. Kitchenered off. Then back to the big toe. Put the 10 st back on 2 circs and picked up 14 st between the toes...seemed like a good number to avoid holes. Did some decreasing at the top of the big toe and kitchenered off. Ditto for the left foot...except I found out my left foot is bigger by a few rows.
I'd say they are pretty comfy and fun to wear! And I'd be willing to knit them again...second and third time should be easier, right?
Friday, April 28, 2006
Knitting projects of #1 Daughter
Here's a few pictures of what my #1 dd has been knitting.
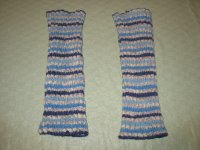
Legwarmers made with Knitpicks Parade on 2 Addi Turbo #1. No pattern...just a 2x2 rib.
A head band being modeled by Barbie. Simply Soft yarn was used...light purple and white for the snowflakes.
A ribbed cap (a Vogue magazine insert that we converted to circular knitting) and matching Multidirectional Scarf. Yarn: Knit One, Crochet Two (Color Box: Blues and greens).
And a cap for her sister. No pattern. Garter stitch brim. The rest is stockinette stitch. Spiral decrease from E. Zimmerman and also in Knitting Rules (p.177...Type A Solution). Yarn: Heirloom (Breeze: shade 002).
Now she's working on a log cabin knit blanket from Mason-Dixon Knitting. It's turning out beautiful!
Monday, April 24, 2006
Left foot, Left foot, Left foot, Right!
Well...you may or may not remember these socks. These were my first pair of Queen Kahuna socks done toe up (March 2006). Although I wore these socks more than a handful of times my toes would complain each time that they were just a bit too short. So out came my 0000 size needles to pick up 66 stitches the row before the toe decreases (which, of course, were really instep increases since these were knit toe up). I snipped off the cap of the toe (which the kids claimed for some unknown purpose). Ripped back to the picked up stitches and with my #1 DPNs I began reknitting the toe. This time I decided I wanted to try doing a LEFT foot and a RIGHT foot. So the decreases were only done on the pinky toe side of the sock. I decreased every other row for the first 10 rows and then every row for the next 14. I also included decreases on the big toe side on the last 2 rows of those 14. (Maybe 3 on the right sock...but I liked 2 better.) Kitchenered off. WHOO HOO! My toes are happy!
Tuesday, April 18, 2006
Fancy Silk Sock
Here's a picture of my first lace sock. The pattern is from Knitting Vintage Socks. I knit this in Koigu KPPPM (#P40226)...first time I've used this yarn. I followed the pattern except for the toe. It was too pointy for me so I redid it with a round toe decrease.
I used #1 bamboo DPNs. Killed my little fingers since I wanted them done for Easter. Even pulled a muscle in my hand doing one of the K2togs. But I got them done! Once church was over I got comfy in my jeans and new socks. Ahhhh!
Wednesday, April 05, 2006
What would a knitting blog be without a few dishcloths?
I won't bore you with all the dishcloths I've knit but here are a few special ones. The two lacy ones are my first lace knitting.
The bottom right one is done in the regular dishcloth cotton yarn (#6 needles:Inc. to 44 st). I used the Multidirectional Diagonal Scarf pattern doing only the first and last triangle (alternate directions on that last triangle).
The bottom left one is done with Patons Grace 100% Mercerized Cotton (#3 needles:57 st). The Horseshoe Lace Washcloth pattern is from the book Knitter's Stash. Grace is thinner than the regular cotton dishcloth yarn but thicker than the crochet thread that I used for the top two.
The purple one above it is also from Knitter's Stash. The pattern is called Lacy Vine Washcloth(#3 needles:55 st). And yes, there is more than one mistake in the garter edge. When I get purling there is no stopping me sometimes. This one and the top green one are done in Royale Fashion Crochet Thread - size 3 - 100% Mercerized Cotton.
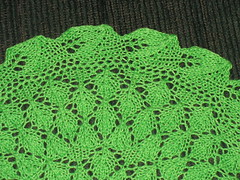
The top green one is the Dragon Scales Washcloth pattern (#3 needles:71 st). Again from Knitter's Stash. Theresa Gaffey supplied 8 linen washcloth patterns for the book and they are all lovely.
I do like using the the cloths knit with the smaller thread when I do dishes (no dishwasher here). They are so nice and thin. It makes the job almost enjoyable! I've actually come to not mind doing dishes thanks to Flylady....it's only a 15 minute job. And although I've fallen off her wagon she still has taught me many lessons that I still apply. Unfortunately knitting beats cleaning. Maybe if I'd make some sort of knitted something to help make the other jobs more enjoyable!
I took the picture upside down to avoid the shadows. Next time I'll just turn the dishcloths around too so I don't get sea sick looking at the picture. Hope y'all can't tell it's upside down. (I shouldn't have said that....done in my best Hagrid voice.)
Saturday, April 01, 2006
In the balance
We've had this scale packed in a box in the basement for years. We bought it at a teacher's store for the kids to weigh and compare things with but it wasn't used a whole lot. That was until now! Now I use it whenever I need to wind one skein of yarn into two balls. Most commonly, a 100 gm skein of sock yarn into two 50 gram balls. I just start winding a center-pull ball. When I think I'm almost half way I put one half into each basket. I keep winding if it is too light or pull some off and put it in the other basket if it's too heavy. Once they are even I cut the yarn and wind the second ball, making sure that if it is a patterned yarn that I'm winding the same direction as the first ball.
I don't have a swift or ball winder...just a loosened lamp shade and my hands. Sometimes a helper will kindly pull the yarn from the lampshade so I can wind faster! But if all the helpers are in bed then I just go slowly pulling the yarn a good distance and winding it up. This is a up on your feet job...walking backwards when pulling and forwards when winding. I love winding yarn!
I got a couple more pairs of socks done. The one pictured here is for dd#3. It is done in Brown Sheep Wildfoote - Columbine. She wanted a pair of socks that matched her fingerless mitts. It has a 2x2 rib in the cuff, heel from the generic pattern, and flat toe decrease. 64 st. on #0 Addi turbo circulars. The cuff is 85 rows -- they are almost kneesocks. Every time I thought the cuff was long enough she'd try it on and pull it up higher on her leg. Nope, still more rows to knit!
She has an order in for another purple striped pair (entry Feb 24, 2006) as the first pair is getting too small. This time she wants a ribbed cuff to keep them from sliding down.
The other pair of socks that were completed were the Knitpicks-Essential in denim for dd#2. This time I made the foot long enough! She wears them constantly. I was hoping to snap a picture of them a few days ago. Unfortunately as soon as the dryer was done they were back on her feet. I am very glad she likes them so much! The only difference in how they were made was that I used the CT&H heel with the slip stitches under the heel also. You can sort of see the slipped stitches under the heel on the pictures of my socks (March 3, 2006 entry).
Also the itchiness of the Knitpicks-Essential must have disappeared in the wash as dd#3 is wearing her pair now...when she wears blue.
Wednesday, March 22, 2006
Our Felted Bags
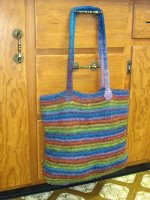
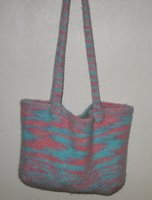
Here are some pictures of our felted bags. The one to the left was the first one made using the Felted "No Rules" Bag pattern with Noro Kureyon. It's the biggest size with a flat bottom.
The bag to the right was done with Koolaid dyed yarn. Same pattern except I decided to start at the bottom, did a rectangle and then picked up stitches around the rectangle and knit up to the top. This one reminds me of a sunset.
This last one was knit by dd#1 with Noro Kureyon doing the "No Rules" bag from the bottom up again. These last two are a bit smaller than the first. The handles have been sewn on since this picture was taken.
Thursday, March 16, 2006
Here's what I did in October and November 2005 while our poor little Cockatiel was sick.
The arm warmers are just a 2x1 rib done on #2 bamboo dpns. The wrist area I switched to #1's so it would be a little snugger on the wrist. I didn't follow a pattern. But I did save my notes on these! There is a little hole for the thumbs to stick through but you can't see that. Yarns left to right: Brown Sheep Wildfoote-Columbine, Sisu in an Old Olive color (9072), Knitpicks Sock Essensials in denim.
The felted gloves are the Fiber Trends: Snow Country Felt Mittens pattern. I did some snow shoveling with the dark green pair and I was impressed with how toasty warm my hands were. I decided at that point to wash my hands with my wool mittens on that were just slightly too big. They felted a bit and are now much warmer than before. I don't have a picture of those...hmm.
Yarns listed counter-clockwise: Nature Wool in a tweedy dark green, Cascade 220 in purple, same in denim.
The original thought was that they could wear the arm warmers up their coat sleeves and then put the felted gloves over the tops of those. Didn't work that way. The arm warmer mitt part would roll when the glove was put on. The only way I could see to fix this would be to attach the mitts between the fingers and the girls didn't want to do that. So they are enjoyed separately.
Tuesday, March 14, 2006
Necessity is the mother of invention!
I was always second guessing myself when I was keeping track of completed rows on paper. Did I mark the row down or not??? I really needed a better system.
I had seen the row counters (broken link removed) at Knitpicks but I needed to count more rows than that. I had also seen the row counter bracelet online and loved the concept but I wanted the counter to remain with the knitting project not my wrist.
So I grabbed my boxes of beads, jump rings and wine glass charm rings and went to work. Viola!
I put one green bead in the link before the odd rows and two blue beads (dark and light) before the even rows. I made the 5th row bead gold (five gold rings) to make it easier to recognize what row I was on at a glance.
Now when I knit a round or row and I arrive back at the point of the counter I know I must move the counter up a row. No more second guesses!
When I get to row 10 on the row chain I move one of the 10 row beads through the stopper beads on elastic thread. Always moving the stopper beads away from the purple starting bead.
I really like it! I've also made them with bigger jump rings for larger needle sizes.
Edited on Dec 12, 2007 to add picture against white background. Click on the picture to make it bigger. Also note that I had to remove one stopper bead from the ring of five. Using five was allowing it to sometimes move on its own when I packed the project into a bag. Not anymore with four! But how many you use will really be determined by the size of the beads you are using for the "10" beads.
Someone asked about the jump rings catching on the knitting. Using two smooth needle nose pliers I haven't had much issue with catching. I try to be sure to push the jump rings together tightly so hardly any light can be seen through the join. Although on the above picture you can see light through some of the links and I don't get caught up with this one.
Friday, March 10, 2006
And some more ponchos...
To the left: We've got the Fiber Trends Easy Lace Poncho done with Silky Tweed. Completed Spring 2005
And to the right: A bright summer beach cover up done in Simply Soft. Just knit two rectangles and attached together. I used fairly big needles so it'd be an open stitch. I didn't keep the rest of the details. Completed Summer 2005.
Clapotis Mania
I was bit by the Clapotis bug and here was the result. I chose Noro Silk Garden #201. 6 skeins. #8 circular needles. I decided to sew it together to make it a poncho instead of a shawl. These were all made Spring 2005.
Great knitalong group here with lots of info on substituting different yarns.
Then the girls all wanted one! Purple is a favorite around here so here's a skinny one in Simply Soft. This one is a scarf size.
The next one was done with Knit Picks Andean Silk - Bluebell. It's oh so soft!
The next two are Knit Picks dye your own Wool of the Andes. The purple-red-blue one was done with kool-aid. The green-blue-purple was done with Wilton cake decorating dyes. Looks better on my dd but she wasn't willing to model that day.
Even Grandma got in on the act. Here's one of her's. I sold her on Noro Silk Garden #34 (love purple and green together) but after it was made she fell in love with a different color...similar to mine at the top but lighter (not pictured).
Tivoli T-shirt
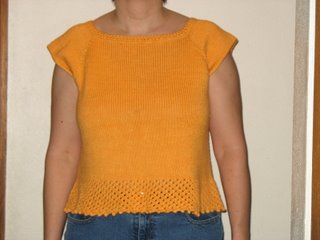
I finished this Tivoli T-shirt in July 2005. (digital camera purchased Dec 05) It's done in Knit Picks Shine-Apricot. Size 5 needles.
This was my first attempt at knitting a sweaterish type of garment. (Although I don't consider it as a sweater since I didn't have to deal with sleeves.) I swatched with #4's, 5's and 6's and thought 5's got guage. Well, it did turn out a bit loose but oh well. I added some crocheted rows under the arm to bring the armhole up. I also added some crocheted rows to the neckline to tighten that up.
For the bottom I used the Cellular Stitch from Barbara Walker's 2nd Treasury (p. 246). I began this after the first waist increase (192 st). 21 Rows. Picot bind off.
I see the pattern has been tweaked and renamed Picovoli. Another thing to add to my project list!
Friday, March 03, 2006
Trekking XXL #109 - Purple-Blues. Addi #0. 72 st. Toe up again with CH&T. This time tried the traditional toe increase instead of fan toe. I prefer the way the fan toe fits.
Very soft yarn. I wore these socks as soon as they were off the needles and there was no itchiness.
I'm doing socks two at a time but on separate sets of needles so they are done within a day or so of each other.
Have you noticed that the socks done Queen Kahuna style aren't as angled as socks done with a traditional heel flap picking up the stitches at the edge to start knitting in the round again. Not saying it's bad or good...just noticed the difference. I'd say that is the angle my legs/feet are most of the time...unless of course I'm standing up!
Knit Picks Essential - Denim. #1 dpns. CO 60 st.
2x2 rib. Heel flap p. 16 Cool Socks Warm Feet.
Toe decrease, p. 19.
Intended for dd#2 but they are too short...after many fittings as they were knit. So they go to dd#3....who thinks they are itchy. We're washing them a few times to see if that removes some of the itch.
This is a pair of black and gray Opal socks. Second pair of CT&H. Addi #0. St. 68.
Did fan toe again. Cast on 7 st instead of 9. Did slip stitch under heel and a few extra rows before turning the heel. 4x2 ribbing on instep and cuff. Crocheted bind off from inside.
Extra length feels better on my toes.
Here's my first pair of socks using Crazy Toes & Heels Socks Book. The yarn is Sisu in an Old Olive color (9072). Addi circular needles: Size 0. 66 st. The toe is the fan toe, slip stitches under the heel and up the back of the heel. The ribbing on the cuff is K4, P2. Crocheted bind off from the inside.
This is the first pair that fits snuggly on my foot. These socks seems to pill a fair amount. But I love them. They are extra warm.
Saturday, February 25, 2006
I also knit a bunch of little socks for Christmas ornaments this year. They didn't all get their pictures taken unfortunately. Some were pairs crocheted together. And some were just mini Christmas Stockings stuffed with chenille stem candy canes.
I used the smallest numbers in the Cool Socks Warm Feet (Basic Sock pattern) for those. Size #1 dpn. One stocking pictured is my first attempt at doing mosaic knitting.
I even kitchenered the toes! I love doing the kitchener technique thanks to the video linked to the right and Queen Kahuna's mantra "Opposite On".
Here's the second pair of Christmas socks that I knit. They belong to my sister. She picked out the beautiful Fortissima Colori Sock Color (Schoeller-Stahl). Color #9072.
This is just a plain 2x2 ribbing on the cuff and down the instep. I followed the pattern on p.39 of Cool Socks Warm Feet by Lucy Neatby.
I don't have any notes for my Regia Socks. Hmm...I do know they were done toe up just like the previous pair, same heel, but 2x2 ribbing up the whole cuff. I think the bind off for these was from the book Simple Socks: Plain & Fancy by Priscilla A. Gibson-Roberts, p. 51. I learned how to weave in my ends in this book too on p. 53. Yes, yes...after my memory came back below this is it exactly. I did that bind off on my dd's legwarmers also.
You may have noticed I'm not too hung up on my socks being identical. In this case I remember doing one sock from the inside of the skein and the other from the outside. Ahhh...it's coming back. This was my first attempt at two socks at once on two Addi #1 circular needles. (Note sizing: Addi #1= 2.5mm, US#1=2.25mm) I'm not too excited to do two at once....too much dropping and picking up the yarn for my tastes. Plus if I want to do mindless knitting while doing something else this isn't the ticket for me. So half way through the foot I switched to my bamboo #1 dpn. The Addis, however, kept working with my dd who had decided to knit herself a pair of legwarms in Knitpicks Parade. So now she too can knit in the round on two circulars. I'm trying to convince her socks are not that hard!
Here's my first attempt at toe up. Used Denise's Toe up sock to start. Then "You're Putting Me On" pattern for gussets. Did some wacky experimenting on the cuff stitches. Crochet bind off from Twisted Sisters Sock Book p. 71.
Plymouth Sockotta: 45% Cotton, 40% wool, 15% Nylon. Color #502. #1 needles.
Subscribe to:
Posts (Atom)