Wednesday, March 22, 2006
Our Felted Bags
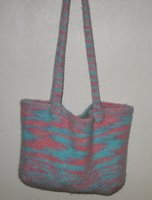
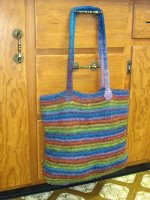
Here are some pictures of our felted bags. The one to the left was the first one made using the Felted "No Rules" Bag pattern with Noro Kureyon. It's the biggest size with a flat bottom.
The bag to the right was done with Koolaid dyed yarn. Same pattern except I decided to start at the bottom, did a rectangle and then picked up stitches around the rectangle and knit up to the top. This one reminds me of a sunset.
This last one was knit by dd#1 with Noro Kureyon doing the "No Rules" bag from the bottom up again. These last two are a bit smaller than the first. The handles have been sewn on since this picture was taken.
Thursday, March 16, 2006
Here's what I did in October and November 2005 while our poor little Cockatiel was sick.
The arm warmers are just a 2x1 rib done on #2 bamboo dpns. The wrist area I switched to #1's so it would be a little snugger on the wrist. I didn't follow a pattern. But I did save my notes on these! There is a little hole for the thumbs to stick through but you can't see that. Yarns left to right: Brown Sheep Wildfoote-Columbine, Sisu in an Old Olive color (9072), Knitpicks Sock Essensials in denim.
The felted gloves are the Fiber Trends: Snow Country Felt Mittens pattern. I did some snow shoveling with the dark green pair and I was impressed with how toasty warm my hands were. I decided at that point to wash my hands with my wool mittens on that were just slightly too big. They felted a bit and are now much warmer than before. I don't have a picture of those...hmm.
Yarns listed counter-clockwise: Nature Wool in a tweedy dark green, Cascade 220 in purple, same in denim.
The original thought was that they could wear the arm warmers up their coat sleeves and then put the felted gloves over the tops of those. Didn't work that way. The arm warmer mitt part would roll when the glove was put on. The only way I could see to fix this would be to attach the mitts between the fingers and the girls didn't want to do that. So they are enjoyed separately.
Tuesday, March 14, 2006
Necessity is the mother of invention!
I was always second guessing myself when I was keeping track of completed rows on paper. Did I mark the row down or not??? I really needed a better system.
I had seen the row counters (broken link removed) at Knitpicks but I needed to count more rows than that. I had also seen the row counter bracelet online and loved the concept but I wanted the counter to remain with the knitting project not my wrist.
So I grabbed my boxes of beads, jump rings and wine glass charm rings and went to work. Viola!
I put one green bead in the link before the odd rows and two blue beads (dark and light) before the even rows. I made the 5th row bead gold (five gold rings) to make it easier to recognize what row I was on at a glance.
Now when I knit a round or row and I arrive back at the point of the counter I know I must move the counter up a row. No more second guesses!
When I get to row 10 on the row chain I move one of the 10 row beads through the stopper beads on elastic thread. Always moving the stopper beads away from the purple starting bead.
I really like it! I've also made them with bigger jump rings for larger needle sizes.
Edited on Dec 12, 2007 to add picture against white background. Click on the picture to make it bigger. Also note that I had to remove one stopper bead from the ring of five. Using five was allowing it to sometimes move on its own when I packed the project into a bag. Not anymore with four! But how many you use will really be determined by the size of the beads you are using for the "10" beads.
Someone asked about the jump rings catching on the knitting. Using two smooth needle nose pliers I haven't had much issue with catching. I try to be sure to push the jump rings together tightly so hardly any light can be seen through the join. Although on the above picture you can see light through some of the links and I don't get caught up with this one.
Friday, March 10, 2006
And some more ponchos...
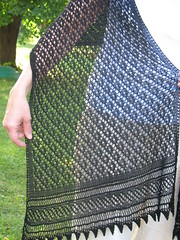
To the left: We've got the Fiber Trends Easy Lace Poncho done with Silky Tweed. Completed Spring 2005
And to the right: A bright summer beach cover up done in Simply Soft. Just knit two rectangles and attached together. I used fairly big needles so it'd be an open stitch. I didn't keep the rest of the details. Completed Summer 2005.
Clapotis Mania
I was bit by the Clapotis bug and here was the result. I chose Noro Silk Garden #201. 6 skeins. #8 circular needles. I decided to sew it together to make it a poncho instead of a shawl. These were all made Spring 2005.
Great knitalong group here with lots of info on substituting different yarns.
Then the girls all wanted one! Purple is a favorite around here so here's a skinny one in Simply Soft. This one is a scarf size.
The next one was done with Knit Picks Andean Silk - Bluebell. It's oh so soft!
The next two are Knit Picks dye your own Wool of the Andes. The purple-red-blue one was done with kool-aid. The green-blue-purple was done with Wilton cake decorating dyes. Looks better on my dd but she wasn't willing to model that day.
Even Grandma got in on the act. Here's one of her's. I sold her on Noro Silk Garden #34 (love purple and green together) but after it was made she fell in love with a different color...similar to mine at the top but lighter (not pictured).
Tivoli T-shirt
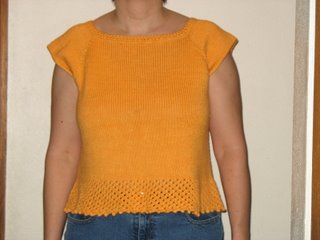
I finished this Tivoli T-shirt in July 2005. (digital camera purchased Dec 05) It's done in Knit Picks Shine-Apricot. Size 5 needles.
This was my first attempt at knitting a sweaterish type of garment. (Although I don't consider it as a sweater since I didn't have to deal with sleeves.) I swatched with #4's, 5's and 6's and thought 5's got guage. Well, it did turn out a bit loose but oh well. I added some crocheted rows under the arm to bring the armhole up. I also added some crocheted rows to the neckline to tighten that up.
For the bottom I used the Cellular Stitch from Barbara Walker's 2nd Treasury (p. 246). I began this after the first waist increase (192 st). 21 Rows. Picot bind off.
I see the pattern has been tweaked and renamed Picovoli. Another thing to add to my project list!
Friday, March 03, 2006
Trekking XXL #109 - Purple-Blues. Addi #0. 72 st. Toe up again with CH&T. This time tried the traditional toe increase instead of fan toe. I prefer the way the fan toe fits.
Very soft yarn. I wore these socks as soon as they were off the needles and there was no itchiness.
I'm doing socks two at a time but on separate sets of needles so they are done within a day or so of each other.
Have you noticed that the socks done Queen Kahuna style aren't as angled as socks done with a traditional heel flap picking up the stitches at the edge to start knitting in the round again. Not saying it's bad or good...just noticed the difference. I'd say that is the angle my legs/feet are most of the time...unless of course I'm standing up!
Knit Picks Essential - Denim. #1 dpns. CO 60 st.
2x2 rib. Heel flap p. 16 Cool Socks Warm Feet.
Toe decrease, p. 19.
Intended for dd#2 but they are too short...after many fittings as they were knit. So they go to dd#3....who thinks they are itchy. We're washing them a few times to see if that removes some of the itch.
This is a pair of black and gray Opal socks. Second pair of CT&H. Addi #0. St. 68.
Did fan toe again. Cast on 7 st instead of 9. Did slip stitch under heel and a few extra rows before turning the heel. 4x2 ribbing on instep and cuff. Crocheted bind off from inside.
Extra length feels better on my toes.
Here's my first pair of socks using Crazy Toes & Heels Socks Book. The yarn is Sisu in an Old Olive color (9072). Addi circular needles: Size 0. 66 st. The toe is the fan toe, slip stitches under the heel and up the back of the heel. The ribbing on the cuff is K4, P2. Crocheted bind off from the inside.
This is the first pair that fits snuggly on my foot. These socks seems to pill a fair amount. But I love them. They are extra warm.
Subscribe to:
Posts (Atom)